Wednesday, March 17, 2010

irish soda bread/corned beef and cabbage

Happy St. Patrick's Day!

I know that most people primarily think me as Italian, but I'm actually nearly half Irish, (with one Austrian great grandfather that I'm not really sure what to make of). When I was growing up, my mom always made a big deal over St. Patrick's Day. We'd always go into the city to see the parade, and have a great big dinner with her sister, Aunt Cathy, my grandma, and her brother, my Uncle James, among other folks. The dinner menu never varied: Irish soda bread, corned beef, boiled potatoes, steamed cabbage with vinegar, and Colman's hot mustard powder, which I only tried once and nearly incinerated my taste buds.

This meal was very different from the pasta and steak and salad variety dinners my parents would prepare the rest of the year, but it was always amazing. The star was clearly the tender, fatty, bright pink corned beef, but all the elements combined to create the perfect meal. Before this year, I had never attempted to recreate my mom, aunt and grandma's St. Patrick's Day feast, but with the holiday falling smack in the middle of the week and busy weekends on both ends, there was no opportunity to go home for my favorite annual March treat. So, for the first time, I took it upon myself to replicate it in my apartment, for what Nathan refers to as "BEEF NIGHT."

beef night

I was surprised to discover how straight forward and easy each component of the meal was. That's not to say I got everything exactly right, and nothing was quite as good as my mom/aunt/grandma would make it. Something about perfectly replicating the family classics is just impossible. However, I do feel confident in sharing the instructions with you all, should you feel so inclined to prepare an Irish American feast this evening in honor of the holiday.

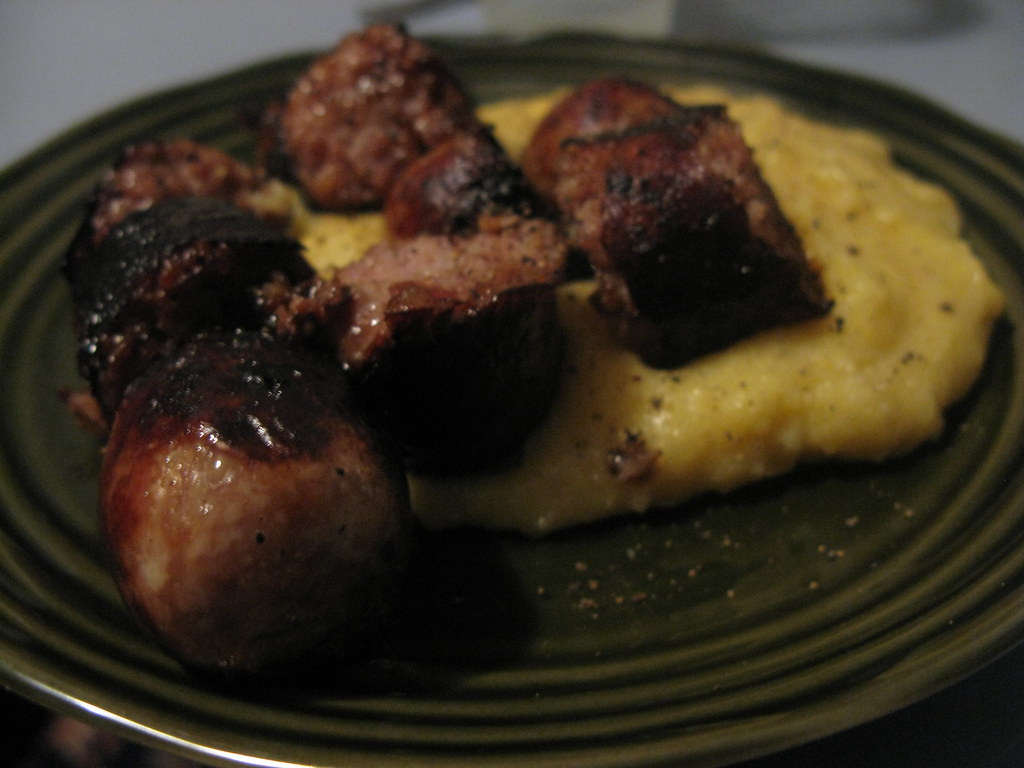
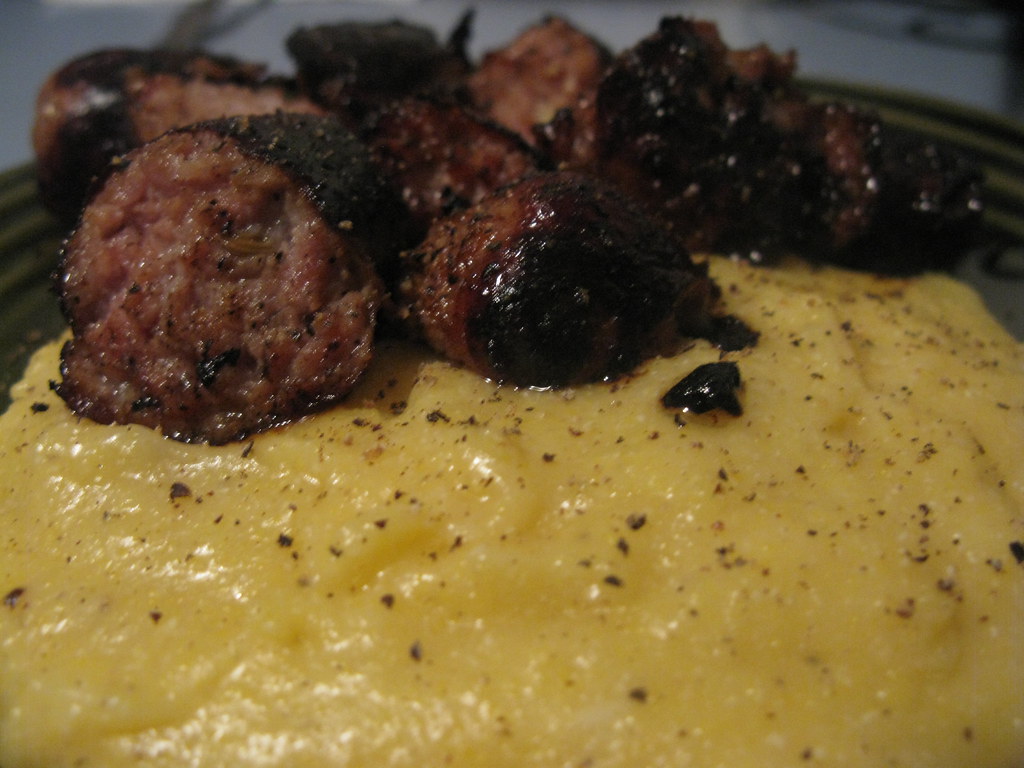
First of all, set aside three and a half hours for cooking the corned beef. This is a completely painless process, as you basically leave it alone most of the time, but it does take awhile. After cooking all that time, the corned beef will definitely shrink up a great deal, so plan on a pound to a pound and a half per person. Err on the side of more so you can have awesome corned beef sandwiches from all the leftovers. The best brand, according to my mom, is Friedrich, and you should get the thin cut as it is the most tender. Put the corned beef in a pot and cover it with water. Bring it to a boil and then dump out the water and add fresh water. This keeps it from getting ridiculously salty. Then you put it back on the stove for what my mom described as a "rolling boil," for three hours. My boil was actually too boily, so watch out for that because it will make your beef a little chewy and tough. It was still delicious, but I will definitely watch the flame and the water more carefully next time. Keep it somewhere between a simmer and an outright boil and you should be fine.

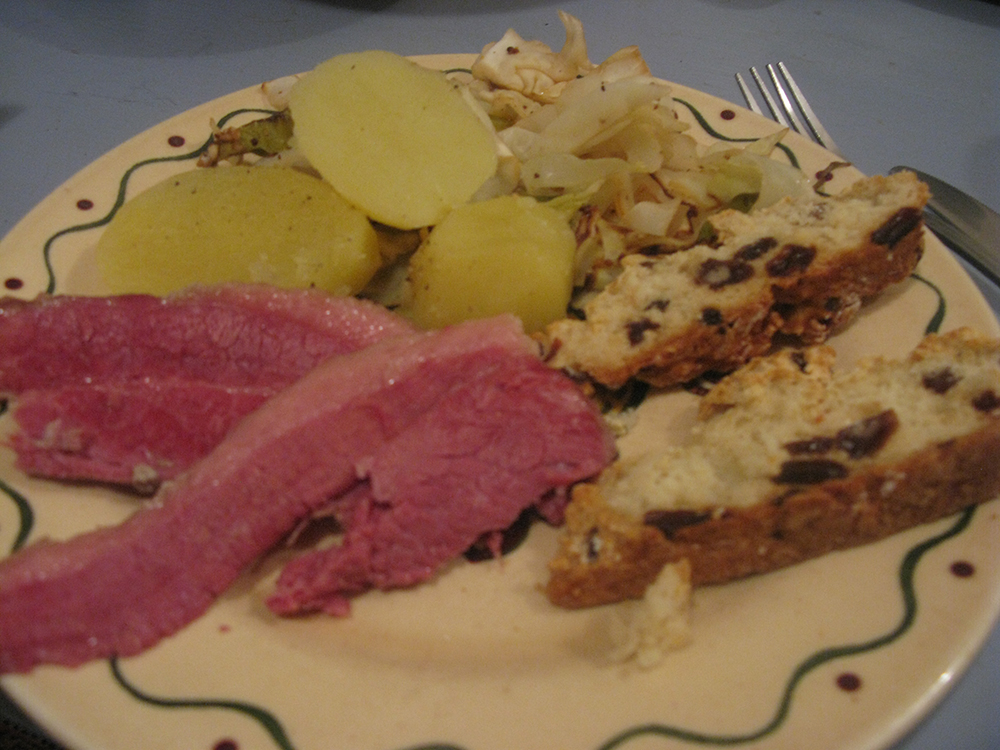
all the fixins for an irish american feast

The potatoes and cabbage are super easy. I peeled the potatoes and boiled them until soft in salted water. I sliced them into rounds so they would cook faster, but my mom usually only cuts them in half. I think I got yukon gold potatoes, and they were surprisingly delicious with only some butter and freshly ground pepper. Nathan had been bellyaching for mashed potatoes instead, but ended up not missing them in the least.

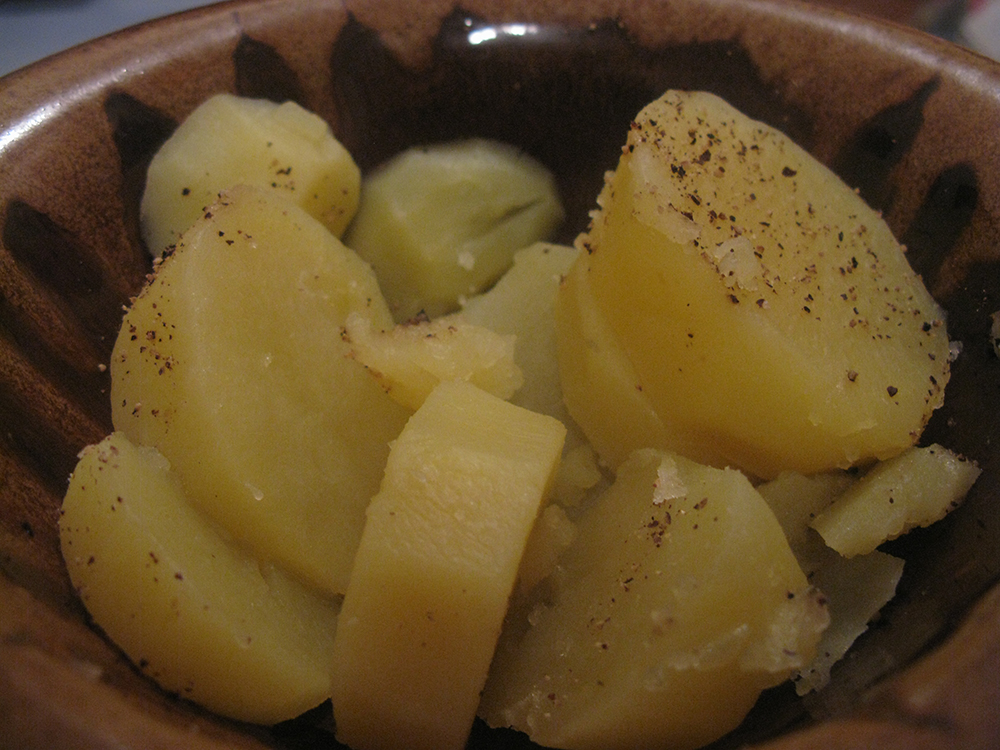
boiled potatoes topped with salt, cracked black pepper, and butter

I sliced up half of a relatively small head of cabbage and cooked it with a few glugs of white vinegar and two spoonfuls of this great grainy dijon mustard that was on sale at fine fare. Of course, the flame went out and since it was on the back burner behind the pot of potatoes it was about 20 minutes before I realized why it was cooking so slowly, aka not at all. Then I obviously cranked up the flame in frustration and all the vinegar and water evaporated too quickly and the cabbage started to burn a little, even while it was still slightly underdone. Whoops. I caught it just in time though, and it was nicely flavored from the vinegar and the mustard despite the burnt-yet-crunchy quality of some of it.

The final part of the meal was the soda bread. In elementary school, my teachers would always have little St. Patrick's Day party for the class. This usually meant green munchkins, sugar cookies and bagels, but I was always called upon to bring in my mom's Irish Soda Bread. (Bridget Dormer's mom always made some too, but even though her dad was legit born in Ireland, their soda bread wasn't as good, so THERE.) I've watched my mom make this, and helped my mom make this, but this year wsa the first time that I actually attempted to make it myself. It is incredibly easy, and super delicious. Unfortunately for Matt, it is the only part of the meal that isn't gluten free, and we've yet to devise an alternative that he can eat.

In honor of it being my grandma's recipe, I will end this entry by posting the whole thing as my mother gave it to me. Like my mom, I used a full cup of raisins, and I made it without the caraway seeds that Aunt Cathy loves so much. If you don't have buttermilk, you can add a tablespoon of vinegar or lemon juice to a cup of milk to achieve roughly the same effect, but with a bread with so few ingredients, this is not recommended.

fresh irish soda bread

Irish Soda Bread
2 cups flour
1 1/2 tsp baking powder
1/4 tsp baking soda
1/4 tsp salt
1/2 cup raisins (I think I use 1 cup)
1 tsp caraway seeds (optional)
About 1 cup buttermilk (better to use a little less & then add if needed)

Sift flour, baking powder, soda & salt. Add raisins & seeds. Mix to a soft dough with buttermilk.
Form into oval, cut cross on top & put on ungreased baking pan (sprinkle pan with a bit of flour). Preheat oven to 375. Bake for 10 min., reduce heat to 350 & bake about 30-40 min.

Should sound hollow when you knock on bottom of loaf.
Check expiration date on powder & soda.
If dough is sticky, sprinkle a little bit of flour on exterior.

All in all, we thoroughly enjoyed our meal, and it's simple enough that pretty much anyone could handle it, although Nathan may have bitten off more than he could chew.


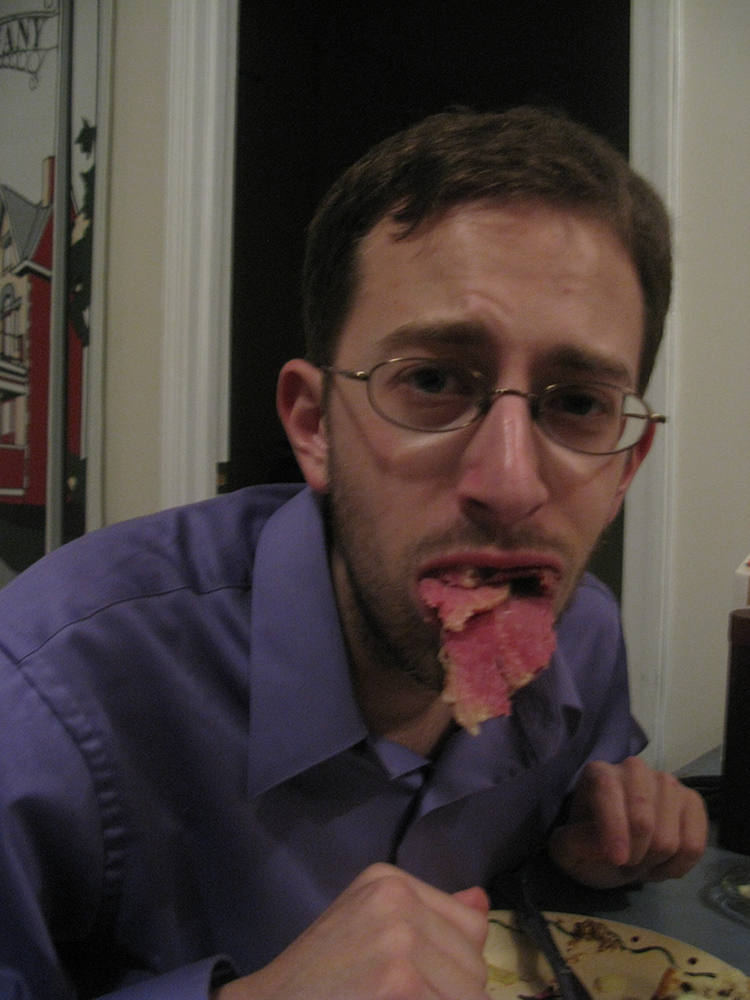
his eyes were bigger than his stomach

Monday, March 15, 2010

pasta with anchovy sauce, wilted radicchio and an olive oil fried egg

So since we've entered the world of food blogging, Nathan and I have noticed that certain recipes seem to make the rounds, and are basically blogged to death. Today's entry is an example of that. Back in 2007, the New York Times Magazine published an article about a new Nancy Silverton cookbook, including her recipe for "Egg Pappardelle With Bagna Cauda, Wilted Radicchio and an Olive-Oil-Fried Egg." Googling the phrase comes up with over 300 hits, including blog posts that are still being published as recently as last month.

Despite its being super delicious, Nathan would have us neglect to mention this recipe entirely, as it is so thoroughly covered elsewhere. Luckily for you, I, on the other hand, am far too much of a completest to fail to mention it.

A couple of weeks ago, I was feeling really down about the loud bar beneath our apartment and the prospect of moving up to a 5th floor unit with fake wood floors and smaller bedrooms. Since then, Laura and I have moved and it's actually not that bad, the extra stairs, fake floors, small closets and ridiculous light switch placement aside. The larger living room more than makes up for the smaller bedrooms, and the high ceilings mean that we can fit a lot more in the kitchen cabinets. However, on that particular day, I was pretty inconsolable about the whole state of affairs— until Nathan made me this for dinner.

This dish has a fair number of components, but everything comes together delightfully. You start out by sauteing anchovies and garlic over low heat. Since I wasn't cooking, I didn't personally witness this, but supposedly the hairy little buggers completely melt away into the olive oil. I can however attest to the fact that this bagna cauda is a surprisingly un-fishy sauce. Nathan boiled some linguini and then cooked it a minute or two longer in the oil with chopped radicchio and parsley, lemon juice and lemon zest. Then he fried two eggs in super hot olive oil and put them on top of each serving of pasta. They cooked super fast and were really crispy on the bottom, with awesomely runny yolks that melded with the pasta to make an even better sauce. Served with plenty of parmesan cheese and seasoned with salt and pepper, this was a really delicious meal, and totally deserving of its great reputation among the food blogging set. It also adapts really well to a gluten free diet if you have the right kind of pasta!

The recipe says this serves four, but that's probably only if you're serving this as one of multiple courses. As the sole dish, this was just enough to feed Nathan and me, without any leftovers. We thoroughly enjoyed every bite, and it really lifted my spirits on a particularly bad day.

UPDATE 6/5: Now we've got photos!

Sunday, March 14, 2010

sausage and polenta/ginger fried rice

I'm going to start off this entry with a totally superfluous plug for Mark Bittman, who many of you are probably familiar with if you have even a passing interest in food and cooking. If you don't know Bittman, he writes both a column (The Minimalist) and a blog, (Bitten), for the New York Times. He's a fountain of food knowledge, and he can quite literally tell you how to cook everything. Today's entries cover two of his recently published recipes, which cover all manner of cuisines and always sound delicious and simple and like exactly what you want to make for dinner.

The first is the incredibly easy creamy polenta with sausage and parmesan. The recipe can be found here, along with an accompanying article in which Bittman attempts to take the fear out of polenta.

creamy polenta with sausage and parmesan

As exotic as it sounds, polenta is really only cornmeal cooked in hot water, and it makes a great change of pace from rice, pasta or potatoes. Nathan and I have made several batches of polenta in the past few months, and at first I tried adding the polenta to boiling water, as I had seen recommended online. This method requires a steady hand and great deal of patience, as the cornmeal will clump if you add too much at once and do not stir constantly. Bittman suggests mixing the cornmeal and cold water into a slurry and then cooking it, adding water as needed. This is definitely the way to go. After cooking for about 20 minutes, I finished off the polenta with butter and grated romano cheese (which I almost always use in lieu of parmesan), and served it with some sliced sweet Italian sausage, making sure to scrape up the pan drippings for a sauce. Served with a salad, this was an excellent and extremely easy dinner.

simple and full of flavor

The second Bittman dinner I've recently prepared is his ginger fried rice. I'd been wanting to make for a few weeks now, especially after it was featured in another one of my favorite cooking blogs only days after I first found the recipe. The reason I had put it off was that I didn't have ginger, but I came home one night and was pleasantly surprised to find that Laura had bought some. How serendipitous!

ginger fried rice topped with a fried egg

Of course, I still had to switch quite a few things around based on other missing ingredients, but that's par for the course when I'm in the kitchen. I used scallions instead of leeks, vegetable oil instead of peanut oil, and toasted sesame seeds instead of sesame oil. I do love some sesame oil though, so I intend to buy some and make this again some time. I also don't have soy sauce, but I never like that too much anyway. Other than those substitutions, I pretty much followed the recipe. Minced and fried the garlic and ginger with some sesame seeds, and then set them aside. I then fried up the scallions until they started to crisp up slightly, and added the rice. I cooked the rice until it got stickier and browner, because that's how I like my fried rice. I seasoned it with salt and pepper and topped with the garlic, ginger, sesame seeds and a runny egg fried sunny side up. I won't say it couldn't have used a splash of soy, and I might have used a few too many sesame seeds, but all in all I was satisfied. Not bad Mr. Bittman, not bad.

UPDATE 6/1/10: Here is another photo of this fried rice, with an unbroken yolk and the addition of sliced mushrooms. I also had the proper sesame oil and soy sauce. The former is a nice touch, but without the latter I would not bother making fried rice ever again. It really does make a world of difference.

Friday, March 12, 2010

Lox


I love lox but I don't like to spend a lot of money. Store- or deli-bought lox often comes at ridiculous prices, with a few pitiful coral slivers weighing in at ten bucks or more. One time I went to the Ess-a-Bagel near where I work and a bagel with cream cheese and lox cost $13. What the Christ? Suckers must think I'm made of money.

One day I decided it was time to take matters into my own hands. I had the bright idea that I could probably make my own lox spread on the cheap if I bought a little lox, shredded it somehow, then mixed it with cream cheese and herbs. I never did find a recipe for this, mainly because I got distracted by an amazing discovery. It's incredibly easy and, most importantly, amazingly cost-effective to cure your own lox at home. If you use this method you can get mass quantities of lox while saving about 75% of the cost.

First, buy a big piece of salmon. I got a big fillet in Chinatown, it weighed about a pound or two, I don't really remember. This cost me around ten bucks.

Next, lay out a big piece of saran wrap and place the salmon on it, skin side down. No need to remove the skin, it'll peel off later. Mix one cup of salt and two cups of sugar. I just used the salt and sugar straight up, but at this point you can also place any flavorings that you would like on top of the salmon. Pepper, dill and various spices all would all work.

After that, cover the salmon with the salt and sugar mixture. You want to make sure it is totally covered on all sides (except the skin side that touches the saran wrap). The three cups of salt/sugar that I used might have been a little much. I feel like there was a lot of excess material, but who knows. This is raw fish you're dealing with so you want to play it safe and make sure it gets cured. Also, make sure to remove the pin bones, which are little toothpick-sized bones that can be in the fillet. They're pretty easy to spot and remove just by pressing down on the fillet and grabbing them.

Once you've done that, wrap the whole bundle up tight in several layers of saran wrap. Place it on a dish (in case any fluid leaks) and let it sit out for 6 hours or so. After that, place it in the fridge, still on a dish, and let it sit for another 24-48 hours (I've seen different amounts in different recipes). I think mine was in there for maybe 40 more hours or so.

When it comes out, discard all of the excess salt and rinse off the salmon. At this point you'll be able to peel the skin off really easily in one piece. Throw it out, or maybe you know something you can do with cured salmon skin? I certainly don't. Take a very sharp knife and slice the salmon into thin strips. Cut diagonally, starting on top with the side that wasn't the skin and cutting down and towards the thin end of the fillet.

Mine came out delicious and the whole operation, including the cost of the fish and estimated costs for the salt, sugar, and saran wrap used, set me back maybe thirteen bucks. I got a ton of salmon out of it.

Check out this New York Times article for some other variations on lox.

Thursday, March 11, 2010

everyone loves macaroni and cheese

macaroni and cheese stuffed artichokes with goat cheese bechamel sauce and lemon zested breadcrumb topping

The one thing that I cook that I'd really say is a crowd pleaser is macaroni and cheese. Two years ago, Laura and I were hosting a joint birthday party in our on campus apartment, and I decided that some really good mac and cheese would be the perfect party food. Macaroni and cheese is one of those foods that can be really really great when it's done right, but I find that it's often too dry, too creamy, or too processed tasting for me to enjoy it. In my opinion, a good version of the dish has a nice cheesy bechamel sauce holding it together, but also plenty of melty gooey cheese layered into it, and a crispy top.

I don't know where you all stand on the creamy vs. cheesy macaroni spectrum but this New York Times article provides some interesting commentary. Despite the current fashion for creamier versions, some purists actually consider what they call "macaroni and cheese sauce," to be an entirely different and entirely inferior dish. To a certain point, I agree. I find overly creamy mac and cheeses can actually trigger my gag reflex. And don't even get my started on the abomination that is Kraft— I may have tried it once, buy my brain has clearly surpressed that terrible memory. However, that is not to say that a cream base is not an essential part of the dish. Without enough of one, the cheese can congeal into an equally unappealing block of oily pasta.

Luckily for my dinner guests, and for you, I've found a recipe that successfully balances the two elements to form the perfect celebration of cheese and carbs: Emeril Lagasse's Macaroni with Four Cheeses

Emeril starts off by making a bechamel sauce from half a stick of butter, four tablespoons flour, two cups of half and half, 4 ounces grated parmesan, a dash of hot sauce, salt and pepper. He pours this over a pound of buttered elbow macaroni mixed with some minced garlic, and then layers the pasta into a buttered baking dish with a pound and a half of cheddar, fontina, gruyere and parmesan cheeses. On top of the final layer of cheese, he adds seasoned breadcrumbs, and then he lets the oven work its magic for 45 minutes or so. This mac and cheese is irresistably good, and whenever I make it everyone always raves about it.

Over the past two years, I've made this recipe many times, including for my and Matt's graduation party, where we totally overestimated and made enough bechamel sauce for ten pounds of pasta—what normally took took 4 to 5 minutes to thicken became a 45 minute affair! After following the recipe very carefully the first couple of times, I've been able to play around quite a bit: using varying the types of cheese included based on what's around and what I can afford, adding sweet or hot sausages, and even baking the pasta into hollowed out artichokes. (As you might now guess, this was the only mac of which I took decent photos. This recipe was our guide, but we ignored large chunks of it.)

My only rules when it comes to the dish is that some of the cheese has to be mixed into the sauce, and that there needs to be lots of it shredded and layered inside to make for gooey cheesy strings when you dig into it. I've used parmesan, romano, goat cheese or even cheddar in the sauce, using more or less of it depending on how much I have, although more is always better. The shredded cheese is usually cheddar with the fontina and gruyere only if I can afford them, although I recently used mozzarella to great effect. I really like to make this with the traditional elbows, but I am not into the skinnier straight macaroni, as it's too reminiscent of Kraft crap. I've also had success using the little shells, or conchigliette, which Laura particularly liked, and to a lesser degree the corkscrew cavatappi. I think my favorite though, is radiatori, because the cheese really clings to its many little ridges.

I actually made a wonderful gluten free version of the dish for Matt just last month with his special penne. It was probably not the best noodle for this dish, but that didn't diminish his enjoyment of the dish. I used Bob's Red Mill gluten-free flour to make the one batch of bechamel, which I divided between Matt's pasta and everyone else's, and no one was the wiser.

Macaroni and cheese is such a classic dish, and everyone loves it. As much as I recommend the Emeril version, there is no one definitive version of this dish, and I encourage you to play around. Throw in some bacon and crispy onions, or use mustard powder or dijon to kick up the flavor a bit. Lots of people like to add roasted tomatoes, and I personally think artichoke hearts or roasted peppers would be lovely with the right cheeses. Despite the Italian ban on mixing seafood and cheese, lobster or shrimp macs are hugely popular. Nutmeg and worcestershire sauce are other common flavoring agents. Personally, I'm wary of eggs, evaporated milk, cream cheese or cottage cheese, but I do think there's plenty of other ways to change it up. If you're looking for more ideas, the Chowhound message board is a great place to start. There is so much to experiment with, I don't see how anyone could ever be satisfied with a box and a packet of powered "cheese mix"!

Wednesday, March 10, 2010

celeriac soup

celeriac apple potato soup

This is a 100% food co-op inspired dish. Before joining my CSA, (short for community sponsored agriculture), I had never even heard of, let alone eaten or tried to cook with celeriac. Also known as celery root, this knobby root vegetable has a tough, woody looking peel that hides a plain looking white interior. Back in the fall, it was included in one of our weekly veggie deliveries. When I made my way past the lettuce and carrots, what I found was a box of dirt. Skeptically, I dug my hands in a pulled out two scrawny and filthy roots. Like much of what we get at the CSA, that day's celeriac was much smaller, misshapen and dirtier than anything that you'll find at the grocery store, or even at a farmer's market. That being said, I was pleasantly surprised when I successfully transformed such an utterly unpromising vegetable into a delicious soup. It was so good that I was inspired to make it again from the giant celery roots on sale at the Union Square green market, and that I am about to tell all of you about it!

First of all, I only discovered this soup via the magic of teh internets. Every time I would come home from the co-op with a strange and intimidating vegetable, (fennel, kohlrabi, rainbow chard, cardoon, garlic scapes, lambs quarter...), the internet would have the answer I was looking for. In the case of celeriac, there were multiple answers, but the one I settled on was a celeriac, apple and potato soup. Although it sounded tasty, I was a little worried about how the sweet apples would stand alongside the savory stock and starchy potatoes. However, the celeriac really brought it all together. If you're still scared, know that Hell's Kitchen's Gordon Ramsay does his own variation with stilton cheese.

The two recipes are very similar: saute onions in melted butter with salt and pepper until soft. Add chopped potatoes and celeriac and cook for about ten minutes. Pour in stock (I used about three cups), dry or fresh thyme, the juice of half a lemon, and one large chopped red apple, (not red delicious, the good kind). Bring to a boil and then turn down the heat and let it simmer for a half hour or so. At this point, I went to town with the immersion blender, but you can also use a blender or a hand masher and sieve if need be, because everything should be nice and soft. Once it was nice and creamy, I added some crumbled blue cheese in lieu of the stilton, and if I had parsley, I definitely would have chopped it and tossed it in for color, as this soup is not the prettiest. The first recipe suggested adding cream, which probably accounts for her soup being lighter than the yucky gray color that mine is, but I didn't have any. I topped it with crumbled bacon and sliced scallions (because I didn't have chives) the first night, and tossed in some extra blue cheese upon subsequent reheatings.

What I can tell you about this soup is that having exact quantities isn't all that important. The first time I made it, I had the tiniest tiniest of celery roots, and a big old bag of baby purple potatoes. The second time I made it, I had a big ass celeriac, and three or four itsy bitsy red potatoes. I would say to try to use more celeriac than potatoes, because the flavor of the celery root is really what makes this soup unusual, but if you're a bit short it will still be good. I'd also say that you shouldn't waste your time peeling your potatoes or apples, as it all gets blended together in the end.

Serve this soup with some crusty bread and a nice salad, and you've got a first rate dinner!

Tuesday, March 9, 2010

the souffle challenge

squash souffle, taleggio and mushroom crostini and lemon buttered green beans

I am often disappointed with the lighting when I take my food photos, but am always too hungry to do much to fix it. This picture, however, I'm perfectly happy with. I love the way the bright green beans pop against the darker green plate, and I find the contrast between the orange souffle and the deep blue ceramic bowl quite striking. My dad would be proud of the plate's well balanced color palate, and for once I've taken a photo that looks as delicious as the meal actually was.

This particular meal was comprised of three things: squash souffle, lemon buttered green beans, and Taleggio porcini and cremini mushroom crostini. I made the souffle back in late December in a bout of culinary ambition. I filled four ramekins, but since I was cooking for myself that night, three of them wound up in the freezer and were woefully ignored until President's Day. Grace invited Marc and me to the New York Historical Society, which was free for the week, and afterward they came by the new apartment for dinner. With almost nothing in the house, it was souffle to the rescue!

Before going out, I had the foresight to take the souffles out of the freezer, but I didn't know what else I was going to serve. On our way back from the museum, we stopped at Fairway, where some beautiful fresh green beans cried out to me. I also picked up some cremini mushrooms, remembering I had Taleggio cheese and dried porcinis at home and could easily recreate the mushroom pizza that was such a hit at my earlier party. Grace rounded things out with some AMAZING espresso cookie ice cream from the SoCo Creamery.

When it came to preparing the green beans, I cooked them quickly in the frying pan with some melted butter, garlic, salt, pepper and a generous squeeze of lemon juice. I also sprinkled on a little Romano cheese. So fresh and light and tasty. How vegetables are meant to be eaten.

As for the mushroom dish, I came up with this Mario Batali gem while looking for some good ingredients to pair with my porcinis. This time, I would take the same basic idea and use it as a topping for the fresh Italian bread Marc's grandma had given him. Either way you go, preparing this topping is super easy and the end result is divinely delicious!

Simply saute garlic and shallots or onions in hot olive oil, and then add the sliced mushrooms. You also throw in and cook off the mushroom soaking water leftover from rehydrating the dried porcinis, some fresh thyme, and season with salt and pepper. Put your mushroom mix on pizza or Italian bread slices, sprinkle with Taleggio cheese, and pop those suckers into the oven or toaster oven until everything becomes melty delicious. Top off with a little grated Romano and some fresh ground pepper and you're in for a treat. This makes for a great pizza, but the crostini is even easier!

I do have a few notes to add: Mario cooks the porcinis before the fresh creminis, but I think I reversed the steps with no ill effects. He adds a pinch of chili flakes, but I skipped those and didn't miss them. He also recommends boiling water and 30 minutes of soaking for rehydrating dried mushrooms, not to mentions straining everything with a cheesecloth to get rid of the grit and dirt... In my opinion that's a lot more work than necessary. I've found that hot tap water and ten minutes work just fine. If you just pour the soaking liquid super slowly, any grit will stay at the bottom of the bowl and you'll be fine!

As delicious and tasty as the green beans and crostini were, the most dominant component of the meal was certainly the aforementioned souffle. Despite having a reputation for being extremely difficult to prepare, this souffle recipe seemed fairly straightforward, and I was really excited to make it. I had read all about how great organic eggs were for souffles, and I had just gotten some from my food co-op. With organic milk and squash, this seemed to be the perfect recipe for me— I even had Swiss cheese in the fridge! Unfortunately, I did have two major difficulties with the dish, which took me many hours to complete. I wish I could tell you that you'll learn from my mistakes, but I'm still not entirely sure how to work out this souffle thing.

That being said, the whole thing starts off relatively easily. I cut the squash in half, (it looked like acorn squash, but you can't always tell exact variety when it comes to food co-op offerings), scraped out the seeds, and salt peppered it, spreading on a little butter. Normally, I'd bake it, but I took a short cut and microwaved it face down, which worked perfectly. I scraped out the shells and pureed the flesh with my handy dandy immersion blender.

Then I started a roux by melting butter and cooking it with a few spoonfuls of flour. When you're making a roux, you want to keep stirring it to make sure it doesn't get burned. As I've mentioned before, this recipe could easily be gluten free if you used some gluten free flour in this step. After a few minutes, I added some whole milk and cooked that until it thickened, continuing to stir. Then I mixed in the squash, grated Swiss, brown sugar, salt, cayenne, and nutmeg. After I took it off the heat, I added the three egg yolks. At this point, I thought I was good to go.

Then came the egg whites. Do not, I repeat DO NOT, attempt to whip eggs whites with an immersion blender. As all around useful and handy as this machine is, this is one area where it straight up fails to perform. At this point, I was reduced to whisking the little shits by hand, which was quite possibly the most frustrating thing I've ever done. After at least a half hour, I abandoned my original batch of egg whites, and started afresh with grocery store eggs that had been sitting the fridge for weeks. These whipped right up, forming stiff peaks even with me doing it by hand. Organic eggs would have been nice, but they were just too fresh for me to whip by hand. If possible, use old eggs, an electric mixer, and definitely don't let any water or yolk contaminate your egg whites, and you should avoid the frustration I experienced.

With that battle won, I folded in my egg whites into the batter in two separate batches. Apparently this makes a difference when it comes to lightness and airiness. I just do what I'm told. At this point, you're ready to put your souffle in a nice ramekin and bake the sucker. I followed the online wisdom for souffles and cheesecakes and cooked it in a water bath, which is supposed to cook it more evenly and keep it from cracking. All that entails is filling a larger pan with an inch of water, and then placing your souffle dishes in the bath to bake. I don't know if it works, but I do know that my souffles all took FOREVER to cook, which brings me to my second problem, which I am still stumped by.

If you have any tips on how to ensure that a souffle is cooked all the way through, I'd love to hear them. The temperature on my old oven was always a wild card, and while the souffle I baked there rose beautifully, it was still quite wet inside when I impatiently bit in. The souffles I defrosted must have been a bit waterlogged, because they barely rose at all. In the future I'd probably add the whipped egg whites after defrosting the batter to avoid this problem. Aside from that I managed to get them cook almost all the way through, but the blue ramekin pictured is deeper than the other ones I used, so it was still a touch underdone. This wasn't terrible, but it certainly was frustrating. How do you test for doneness without deflating the thing? Tricky tricky.

Anyway, these problems aside, the squash and cheese and brown sugar made for a delicious combo. This is a damn tasty recipe, but I think that a really well cooked souffle calls for a little bit of practice! However, I still think Grace and Marc enjoyed their dinner, and it probably didn't hurt that I ate the most underdone of the three souffles. It was just so great to have them over and to cook for them without worrying about tiptoeing around crazy people. We just relaxed and watched the Olympics with Laura and Taylor and had SO MUCH FUN. In conclusion, I love living in a reasonably accessible part of the city.

Saturday, March 6, 2010

eggs benedict burger


eggs benedict burger

One of the most delicious things in the world is Hollandaise sauce, and for good reason. I mean it's mainly egg yolk and melted butter, two things that make pretty much everything richer and better. Add in a squirt of lemon juice, a few drops of hot sauce, and a dash of salt and pepper, and you've got some liquid love to pour over your plate.

It almost sounds too good to be true, and I have to admit, there is a catch. Actually getting the sauce to the proper creamy state is no easy task-- all too often, the sauce breaks and you wind up with lots of grainy yellowness floating in butter, and you want to break down and cry. However, there is an easy save which I find myself relying on 9 times out of 10: add a splash of cream or half and half and whisk until everything magically comes back together. Whenever this happens to me, I can't help those feelings of despair that come creeping in: "this time I've really ruined it! my hollandaise is beyond repair!" By now, I should know better than to doubt cream's restorative powers, as this is a never fail fix.

Of course, part of the problem I think I keep having is that I am trying to do without a double boiler, which most recipes recommend you use in order to get the eggs to cook without scrambling. Instead, I've tried adding the melted butter into a bowl with the yolk, lemon, hot sauce, salt and pepper, and beating that together before putting that over the heat again to thicken it. For some reason, this doesn't work quite as well as the traditional method, which I've tried on less lazy occasions. Feel free to go the extra mile with the double boiler, but if you don't, you've always got the cream trick up your sleeve.

Anyway. Hollandaise sauce is great over steamed vegetables, but of course is best known as the main component of eggs benedict. I like to make up my own variation of the dish with the expected english muffin, bacon and poached eggs, elevating it to dinner or lunch status by serving it on a nice meaty burger. Nathan and I did this last week with grass fed beef I got from the food co-op's winter share. Both of us were amazed how different the grass fed beef tasted— so much meatier, almost like marrow. It wasn't necessarily better than the beef you're used to, but it was definitely an unexpectedly delicious change. We made half pound burgers, which is larger than I usually eat, and it was more than I could finish. It was also a little bigger than my muffin could handle, so you might want to follow Nathan's lead and use a nice kaiser roll. I love kaiser rolls, but they are usually much bigger than the burgers I eat, and in this case eggs benedict is supposed to be on an English muffin.

You may notice that the hollandaise sauce in the photo, (which features an earlier benedict burger made with ground beef from the butcher), is a little weird looking. That's because I melted the butter in with the bacon grease that was already in my pan, so there's some bacony crumbs mixed in there. This was tasty, but made me feel even more like I was about to have a heart attack, so keep that in mind before you try it in your own kitchen.

Tuesday, March 2, 2010

Ramen

Time for a quick post to address an issue that I've wanted to talk about for a while. A lot of people out there are hating on ramen, claiming that it is bland and only good dorm food/poor food. But fuck that, because with just a bit of effort you can take a 25-cent pack of Top Ramen and turn it into a very respectable noodle soup with a rich, slurpable broth.

You will need the following ingredients:

- A pack of ramen. If you're just using Top Ramen or Maruchan, "Oriental" is the best flavor, followed closely by the more full-bodied "Pork." A better brand, but more difficult to find, is this Thai shit called Mama. The packets are smaller, though, so you'll probably want to use two.
- Sriracha sauce.
- Hoisin sauce.
- An egg.

The key here, though, is the method. I've experimented with various steps to take, and I believe I have found the perfect way to cook ramen:

1. Boil water in a small pot. You really don't need to use very much water here - aim to use no more water than will eventually fit in the bowl you eat your ramen in.
2. When the water is boiling, put the ramen noodles in. Don't put in any of the other ingredients.

3. When the noodles are almost done boiling, place the rest of the ingredients in a good-sized bowl, the one you will be eating the ramen out of. Crack the egg in and empty the ramen flavor packet on top of it. After that, put in as much of the two sauces as you like. I like to use about a tablespoon each of the hoisin and the Sriracha. At this point you can also add any additional ingredients that you like. A splash of fish sauce is great. A few scallions or chives can be good, too.

4. Here's the most important step. When the noodles are nice and soft, dump the boiling water and the noodles into the bowl with all of the ingredients, then stir it vigorously. This will cook the egg and make it infuse the entirety of the broth, giving it a lot more body and a hearty flavor.

Now you're ready to eat it. I like to sip on the broth as it cools, then move onto the noodles after a few minutes.

A lot of people make the mistake of adding the flavor packet to the boiling water while the noodles cook, but I think that this dilutes the flavor and can often result in wasted broth. My method ensures that you don't waste any flavor or broth. I'm not sure why, but it seems that more of the flavor seeps into the noodles this way.

Unfortunately, Sarah was being churlish the last time I made this and wouldn't taste the broth. She missed out.

Monday, March 1, 2010

jambalaya

jambalaya and salad

Now, I consider myself to be a pretty good cook, but I'll be the first to admit that my range does not extend much beyond Italian food, American food, and maybe some basic French stuff. However, with the Saints playing in the Superbowl earlier this month, I got inspired to make some jambalaya, which is definitely outside my culinary comfort zone. My mom hates sausage and peppers, but selflessly agreed to my dinner plans, and cooked everything with me.

I found two recipes that we used, but I wasn't quite happy with the result. Sometimes AllRecipes can come through with something great, but I think the tendency there is for recipes that are overly simplified for the home cook. With such short cuts, it is difficult to develop any real depth of flavor. Unfortunately, in this instance, we took a cue from the AllRecipes jambalaya that we probably shouldn't have, and served our jambalaya over rice, rather than cooking the rice with chicken stock and all the other ingredients, as the second recipe had instructed. There wasn't much to taste other than the smoky and spicy andouille sausage, green peppers and tomatoes. If I made this again, I would definitely cook the rice in with all the other ingredients, as I suspect that would impart the whole dish with a richness and depth of flavor that it sadly lacked.

I wish I knew more about Creole and Cajun cuisine, as I felt completely out of my element trying to make a New Orleans classic. We used chicken and shrimp in addition to the sausage, and stuck to the so-called Holy Trinity of green peppers, onions and celery. Basically, we cooked it all up with tomato paste and canned tomatoes... It was fairly tasty, but I wasn't satisfied. I would definitely try this again and try to infuse the rice with the flavors of the dish, rather than mixing it in after it has been cooked. As it was, it just didn't seem like real jambalaya, even to my inexperienced palate. However, I did happily eat the leftovers while watching the Saints win!